Pages

Monday, 12 May 2014

Lego Set 71006: The Simpsons House

Check out the contents of Lego Set 71006: The Simpsons House:


This is definitely the largest set I've ever put together! 


There are 7 sets of bags, baseplates, stickers, and 2 instruction booklets. 

Step 1: 2 bags
Step 2: 3 bags
Step 3: 3 bags
Step 4: 3 bags
Step 5: 3 bags
Step 6: 2 bags
Step 7: 3 bags

My plan is to build one step each day, and I'll post my progress.

Sunday, 4 May 2014

LEGO Review: Lego Minifigures Series 13 - The Simpsons

I have enjoyed all of the Lego Minifigures Series so far, but I was super excited about Series 13 because it is all Simpsons characters, and I love the show, the movie, the comics, and the Simpsons Tapped Out game.


All of the characters with short-sleeve shirts have painted arms, which is new.


Homer comes with a remote control and a donut. The minifigure is the same shape as a normal one, but the paint detail on the shirt suggests that Homer has a belly. The paint detail on the back of his head does a great job of showing his hairline. They did a good job on the donut. 


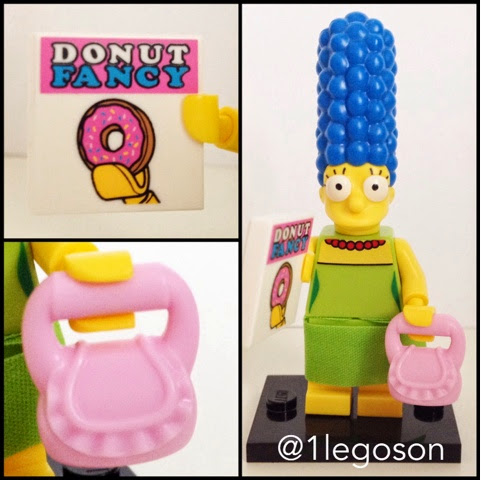
Marge's hair is awesome! She comes with a copy of Donut Fancy and a purse. Her red necklace is painted on the torso. Because of the weight of her hair, she can't really stand up without Lego studs holding her up.


Bart's hair is perfect, and the legs are painted so he is wearing shorts. This character isn't holding anything like the other minifigs, but his slingshot is painted on his back of the torso and legs. He also comes with a skateboard. 


I also like the shape of Lisa's head. She is wearing a skirt, which we couldn't seem to get to fit properly. We'll have to figure that out. Her pearls are painted on the front and back of her torso, and she comes with a saxophone. 


Maggie's eyes are cute! She has a red  soother and worn-out teddy bear. She doesn't have legs, but is made to look like she is crawling. It's really neat how her body is just one piece.


Grandpa has lots of detail on his face, including his wrinkles and his glasses. He is holding a newspaper which features a story about him.


Ned's green sweater and mustache are awesome. He also comes with two accessories - an I heart South Paws cup (from his Leftorium?) and a toolbox with "Property of Ned Flanders" painted on it. It might have been funnier if the toolbox had come with Homer!


Milhouse comes with short legs (also wearing shorts). His blue hair and red glasses are a nice touch - the arm of the glasses go all the way to the back of his head. He is holding a comic book.


Apu is also very detailed, including the shape of his hair, his mustache, and his chest hair. They did a good job with his clothing, too. He is holding a squishee. It would have been great if he came with a sign that said, "Thank You. Come again."


Chief Wiggum is wearing a basic police officer uniform, with the details of his badge on the torso and the hand-cuffs on the legs. His hat is attached to his head, and the shape of his nose is perfect. He is holding a baton and a megaphone.


Ralph Wiggum also has short legs, and his belt is painted on his torso. The painted hair detail is great, going all the way around his head. He is holding the Valentine's card for Lisa.


Mr. Burns also has great detail in the shape of his face, hair, and teeth, including age spots on his head. His nose is perfect. He is wearing a business suit, and he is holding a radioactive rod and Blinky, the three-eyed fish.


Nelson's outfit is perfect - he is wearing his usual t-shirt, vest, and shorts. His mullet is awesome! He is carrying a baseball bat - an accessory that Lego would have already had from previous minifigure series.


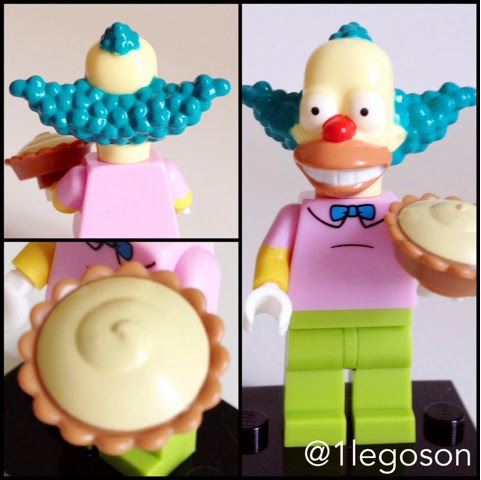
Krusty the Clown has awesome hair. The painting on his face is perfect, and he is wearing a short-sleeved shirt, blue bow tie, and white gloves. He comes with a pie, of course.


Itchy has great detail in the shape of his face and teeth. It's a little weird that he doesn't have a tail. He is wearing an orange shirt and is holding a club - an accessory that we've seen in other Lego sets. Another option for his accessory would be a chainsaw.


Scratchy also has great detail in his face and head shape, particularly the teeth and tongue that are sticking out. He also has a tail attached to the torso. He is holding an axe - the same one that we saw with the woodcutter in Series 5.

Overall, I think they did a great job with the Simpsons minifigures. Each character's hair and face shape has been captured, and they paid attention to detail when painting on clothing and other features. Lots of the accessories are really cool and suit the characters.

I'm not sure why Itchy and Scratchy were included in the series, since they are not people of Springfield and there were other characters that I would have like to have seen included.

I hope they make another series. If they do, these are the characters I'd like to see:

Comic Book Guy
Sideshow Bob
Snake
Moe
Professor Frink
Smithers
Principal Skinner
Mrs. Krabapple
Groundskeeper Willie
Cletus
Carl
Lenny
Jimbo Jones
Martin Prince
Barney 
Fat Tony

Who would you like to see? 

Link Costume for Fan Expo

Last year, I enjoyed going to ComicCon in my city, but it was a small event. I was thrilled when I heard that our city was going to have a much larger Fan Expo. 

I decided that I was going to dress up as Link from The Legend of Zelda.

The first thing I did was make my Deku shield. Luckily, we had just been to Ikea, so we had lots of cardboard. I traced the outlines for the different layers of the shield, and then my dad cut them out. 

I painted each of the layers. Unfortunately, we didn't take many pictures of that part of the process. 


We used a hot glue gun to adhere the pieces of the shield together, and we also hot-glued some cord on to the back so I could hold it. 


I didn't have an ocarina, but I did have a pan flute, so I hot-glued more cord on the back so it could hang around my neck. 


We bought some felt to make Link's hat. I don't have a sewing machine, so my dad hand-stitched it. 


We also bought a cheap, green t-shirt and cut the neck out of it. I used a black belt and a sword that I had from another costume. 


When we were at Fan Expo, it was fun seeing all of the costumes. I posed for pictures with a few people who also had Link costumes. 


Painting Emmet from The LEGO Movie

The first step is to choose a photo that has lots of contrast in it. 

Next, import your photo into fotoflexer.com. Click on "effects" and choose "Ink Stamp".

See how the picture turns out. You may need to choose another picture if there's not enough contrast.

The next step is to put your photo on a transparency. Project your photo onto black Bristol board, and trace everything with a white pencil crayon.


Here are a few things I learned:

1. Don't put the tape over the corners like I did. Roll up a piece of tape and stick it on the back. Some of the paper ripped off when we took the tape off. I used a Sharpie to cover those sections. 

2. Any letters or names are going to be reversed on the projector, so flip your picture before you print it. I had to use my best guess to flip the letters myself. 

3. When outlining everything in white, turn off the projector once in a while so you can see if you've missed anything. 


Have both your original photo and the overhead handy when you begin to paint. 


Use white paint to paint everything that's white on the picture. Use small brushes and a steady hand to outline thin lines. 


I needed to do two coats of paint, and I'm pretty happy with how it turned out. I made one of his eyes too small, so I used a Sharpie to fix it.


We went to Michael's and bought a poster frame, and this is hanging above Lego City in our basement. 


That other awesome Lego painting in the background was painted by my mom & dad's friend who did a whole series of Lego paintings of 2001: A Space Odyssey.


Sunday, 2 March 2014

Minecraft Birthday Party

I've mentioned how much I love taking my art classes at 4Cats Arts Studio. This year, I decided to have my birthday party there because they have a new Pixel Party, and I was the lucky person to have the first one. 

When we arrived, Messy Martha had already prepared the grid for the Creeper painting on a 36-inch square canvas. She had marked off where we were supposed to paint black. Each of us painted the section nearest to us. 


Then we used different shades, tones, and tints of green to randomly paint the rest of the squares. Every couple of minutes we switched colours so that we had lots of variety in our sections.


I can't wait to see the canvas when it's stretched. We are going to hang it my video game room.


Next, we all sculpted a creeper. A few of us made Minecraft Creepers, and some of my friends got creative and added mustaches, hats, horns, and tap dance shoes. One was a Hammer-head Creeper


While we ate, Martha added pins and then put the Creepers in a toaster oven. She made each one into a key chain that everyone was able to take with them.


After we enjoyed some pizza, we had cupcakes. My mom and I baked the cupcakes using this recipe. We added green frosting and used a different shade of icing to add grass. We added paper wrappers and Creeper faces that we printed from The Party Animal. We taped the faces to cake-pop sticks.


At the end of the party, everyone left with a goodie bag. My family had a lot of fun preparing them. After seeing lots of ideas on Pinterest, we went to the candy store and found candy to include in our goodie bags. I also made some Minecraft things out of Perler Beads and each of my friends got two of them.


Gold = Butter 'n Cream Candies
Diamonds = Hershey's Kisses (Cookies & Cream)
Gravel = Chocolate Pebbles
Redstone = Caramel Cups
Sticks = Pretzel Sticks
TNT = Mini M&Ms

Here's a close-up of the Perler Beads (the Enderman was upside down - oops!):


My mom used Photoshop to make the toppers to label the bags. She used the Minecrafter font to add the Minecraft name and what kind of candy was included. We folded and stapled them to  snack-size bags.


We also really like the name labels that we saw on a pinterest post, so we created our own in Photoshop. 


I loved everything about my Minecraft Party!

Tuesday, 31 December 2013

Happy New Year!

Come check out my Minecraft house while you wait for the New Year's countdown:


Best wishes in 2014!

Sunday, 8 December 2013

Lego City Advent Calendar 2013 - Week 1

I always enjoy December when I have a Lego City Advent Calendar to open each day. It's exciting to start my day with a little Lego fun!

Here are the first six advent calendar sets from 2013:

Day 1: Police Officer Minifigure - I really like the detail in his face, as well as on his vest. 

Day 2: Fireplace - I love the detail in the chimney. This is something that I can use in one of my Lego City houses.

Day 3: Dalmation - I was glad to get this dog because there is one in the new Fire Station set, but since I had the old fire station, I didn't buy the new set. I'm glad to have the dalmation for my Firehouse.

Day 4: Snowman -There is always a snowman in the Advent Calendar sets, and it is always holding its carrot nose! The snowmen are good to add winter detail to a Lego City.

Day 5: Police tools - while these are cool, I have lots of these from past advent calendars.

Day 6: Robber - Similar to the police officer, this minifigure has lots of detail on his face and torso.

Extra pieces: One thing that's great about the advent calendar is that they always include lots of extra pieces. Here's what I have so far: